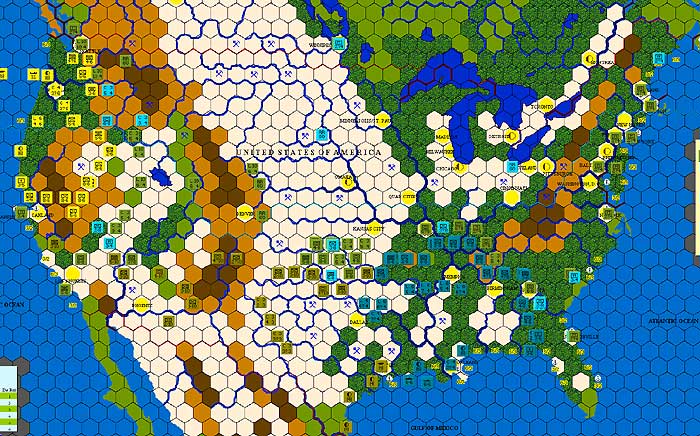
My friend Bill and recently finished a spirited play of Scenario 1 in Invasion: America. The game was played using a Cyberboard module designed by Chris Fawcett.
I defended my homeland while the invading communist somehow ended up controlled by said Australian. I pulled out the game with a 1 roll on a 1-1 attack, retaking Atlanta – after the game Bill wrote up some notes from the invaders point of view which I thought other potential IA players might be interested in. I’ll throw in my comments from the US perspective in italics.
1. Land a Supply unit in the first invasion if possible. Lack of one hampered my build up. I had to leave Amphibs as beach heads to supply and act as ports for reinforcements. Once you do that, you are limited in landing Supply units. In my case, I was lucky to capture a port for the SAU early on. The ESC were hamstrung and captured New Orleans on about turn 3 - which was the same turn I was able to get a supply unit on line. The PAL never captured a port. Very bad. I subsequently had to "re-invade". The second invasion was much better simply because I had the Supply units in place. But the reinvasion wasted valuable time.
2. Don't engage in pounding LRB's to junk, unless you can add the CAS to the attack. The whole air war thing took us a while, but on only a couple of turns was I in a position to influence ground battles, and mostly that was because you had exchanged most of your LRBs in the previous turn with my CVs. In any case, US LRB's come back, mostly Aggressor LRBs don't. Agreed, LRB’s are the key units for the US – early in the game I used them to battle the CV’s and a run of 6 rolls allowed me to wipe them out. It hurt at the time but I think it helped in the long run. Later in the game I took advantage of the longer US LRB range(10 vs. 6 hexes) to neutralize the aggressors air power. The US can protect a long line of units with a single LRB. As Bill mentioned, the US LRB’s ability to come back as replacements must be taken advantage of.
3. Don't stack CV's and LRB's. Stacked air units mean less US LRBs are required to achieve air superiority (if the US player is prepared to sacrifice an LRB), and that means more LRB's can influence ground attacks. It did take a while for us to figure out the nuances of the air system. On the first turn Bill had all the ESC CV’s stacked and the US was able to achieve air superiority with a single attack.
4. Aggressors must attack. Attack. Attack. Attack. Even when my SAU armies disintegrated twice, opportunities made it possible for the SAU to punch through lines. US forces had to rail in to near the SAU units, but couldn't attack. All the US player could do was shore up the line, allowing the Aggressor to replace and reinforce to hold the precious gains. The first series of disasters for the SAU, however, were only mitigated by the destruction of some good US units, as well as the opportunity to push a few small units deep into US territory. Attacking is required for the aptly named aggressors, but conversely, the US should pick and choose it’s attacks. It’s worth a few risks trying to push back in the initial amphibious landings, but after that take care. I certainly paid the price for a couple if ill-advised attacks. On the last turn, of course, without the worry of counter attack, you can cherry pick a few victory point hexes.
5. Infiltrate. If you see a gap in the line, push something into it. Force the US player to attack you back. Attacking is a very dangerous thing in this game.
6. Outflank. I never tried this. But if I ever play again, I will. There were opportunities to create new invasion sites for the Europeans. If I wasn't so desperately trying to organize my supply for the ESC, there would have been a good opportunity to reinvade on the East Coast. By the time I could do it, the US player had beefed up a couple of holes, and the last of the available ESC units were needed in the main battlefront. This was a big worry for me the whole game – I ended up garrisoning all the naval hexes with militia units. More invasion points would have canceled some of the advantage the rail units give the US player in responding to holes.
One issue I as the US got burned on a few times was attacking with a militia and non-militia unit – twice the militia flipped over as a zero and caused the non-militia unit to retreat before combat. If you have to use an untried militia for attack, try to keep them in a hex by themselves.
Also, this scenario had the South American Garrison rule in effect. I chose to abandon South America immediately and I think it worked out well. The US just doesn’t have enough units to cover South America too. The SAU did walk all the way to Arizona by the end of the game, but I think I that was more a result of my over attacking a bit when they invaded Texas. I say hold the moral high ground and forget occupying south of the border.
Anyway. All in all a really good game. Even though you accidentally snatched
victory ;-) I agree, except for the accident part, I planned it all the
way :-)
Here is how the map looked at the end of the game (click on the image to link to a huge (1.55 mb) full size image).